-edible zone-
-- Listed Specifications:
Capacity / Resolution:
100G / .005g
on the center platform.
20g / .005g on the lower platform cantilever
extension.
Units: g / oz / T / gn / dwt / ozt / ct
Tare Range: Up
to full capacity
Auto off: After 1 minute
Operating temp: 0 - 40°C
Display: 5 digit LCD
Power: One AAA Alkaline battery (not included)
Dimensions: 92.5mm x 52mm x 13.5mm
website: https://www.riverstoneaudio.com
--
Intro:
For those among us still playing records, and for
those among us who may want to start playing records, there are some
necessary tools that are to be considered as infrastructure. Among the
'tools' one needs in order to support the hobby are a -dry- record dust
brush, a stylus cleaner of one sort or another, a -wet- record cleaning
system, and a VTF scale. These aren't the only tools one needs, but they
are to be considered essential. The VTF scale (the subject of this
review) is used to accurately set the vertical tracking force at the
very tip of the diamond stylus that tracks the record groove.
Always, phono cartridges come to us with a recommended tracking force
range. For instance, on a vintage Shure M91E I see in their factory
specification a recommended tracking force setting that ranges from as
little as .75grams and as much as 1.50 grams. If your setting goes
outside of this range, negative and audible effects can be
experienced...if not also to mention the potential for damage to your
valuable record collection. For this reason alone, everyone playing
records needs an accurate VTF scale.
Over the years there have
been different types of VTF scales made available. A popular one that
was in common use back in the 1970's and still in use today is the Shure
SFG-2. It is a mechanical balance beam scale complete with a sliding
weight. A decade before the Shure scale, there was that Garrard SPG-3. I
have an example of both of the above. In a pinch I will still use the
Shure SFG-2. But let us fast forward into the present. Now we live in a
digital age and we can find many different examples of digital VTF
scales currently available to us. Which brings us to the subject of this
review; The Riverstone Audio Record-level Vertical Tracking Force Gauge.
This gauge (scale) features a 5 digit lcd display with a 100gram
maximum capacity. It will read in grams out to 3 decimal places and do
so with a repeatable accuracy to 0.005 grams. What makes it interesting
to me is it has been adapted to hold the stylus, with tonearm attached,
at the same approximate level as it would be while playing a record. In
a couple of paragraphs I will give reason for this feature. For now let
us look at what comes in the kit for ~ $30.00 usd
*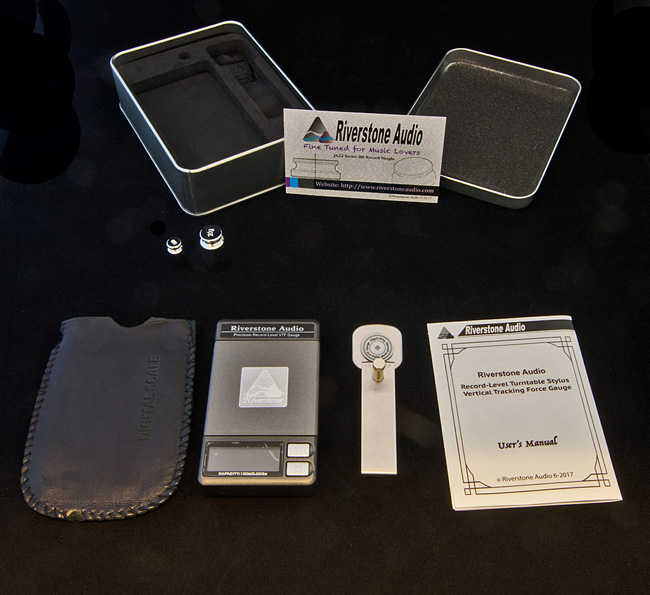
-- Here's everything you get for $30.00 usd : Steel case for safe
storage, two calibration weight standards (5 and 20gram), A leather
case, the scale, a metal protective lift-off cover that fits over the
center platform, the 'cantilevered extension arm' and the user manual.
It's a sharp looking kit and a nice presentation on the part of
Riverstone Audio. (btw, save the manual, you'll want to have it)
-- Upon further examination what I see is a small compact
digital scale with Riverstone Audio labels on it. Nicely done labels! I
see the record level adapter lever, which they call a 'cantilevered
extension arm', that clips over the center platform, getting hooked
underneath on either side. The folded sheet metal extension has 180°
hook on its narrow end and catches into a slot just underneath the
platform, left side. On the other end of the cantilever, with the
'record level measuring platform' there fits a screw in a slotted hole
with an oblong metal tab/clip at its bottom. Turn the knurled head up
topside and the clip/tab rotates with it connectedly with the ultimate
goal being to stick that oblong tab length-wise into a slot just under
the above center platform.
-- Like all VTF scales, it
measures the vertical tracking force of your arm/cartridge, except that
it measures tracking force at record level to increase accuracy of the
setting.
-- But why Record Level?
*
-- I can think of two reasons; The first and most common reason is
that if you were to set VTF on your tonearm / cartridge at, say, 3/4"
higher than at record level, the force you set would not be exactly the
same as at actual record level. What we seek here is accuracy. The
second is a somewhat specialized reason. I happen to own a Thorens TD124
turntable that has the heavy iron flywheel beneath that propels above it
the upper light clutch-operated aluminum platter. The concern is that
some phono cartridges (particularly moving coil cartridges) have magnets
within them strong enough to become attracted to that iron flywheel
beneath. Think of a phono cartridge trying to pull itself down into that
spinning iron less than 1/2 inch beneath it. This would result in a
setting much heavier than you thought had you set vtf off to the side,
like many do, and not directly over the iron. However, it is possible to
compensate for this magnetic force by setting vtf --at record level--
directly above that iron flywheel.. The closer that cartridge is to the
arm, the more it gets pulled... Anyway, when you check the vtf reading
above the flywheel and then off to the side and away from the iron, you
get two different reads. Therein lies the proof in that pudding. By
setting vtf directly over the iron, and at record level, I have
compensated for the magnetic pull of your typical low output moving coil
phono cartridge. And I do use that type of cartridge. This is why I am
interested in using a record level vtf gage. And perhaps you might be as
well....especially if you have a TD124.
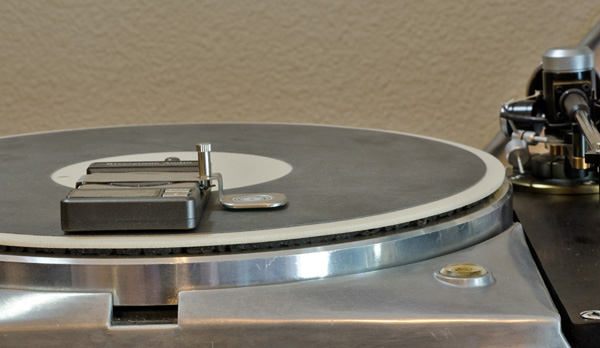
-- Here are two example photos of the setting on the TD124 The cartridge in use is a Shelter 501-II.
* Read over iron (click thumbnail for full image size)
* Read away from the iron
-- Anyway you do the math to see how much force is in that pull when
over the iron. The point is that I now know what my 'actual' VTF is when
playing over the iron platter. It is absolutely essential for those
using this turntable.
Something useful, I hope:
Just so you know up front, you'll spend some time calibrating this
scale. It comes calibrated for the 20g std. But we really need it set to
the 5g std. We're measuring in the range of 0.5g to 4.0g. when playing
Lps. So I study the instruction manual to figure out how to change the
calibration. It seems there are 5 steps described to calibrate this
scale. But it wasn't that hard to follow. In case it might be useful,
below is my perceived version of the procedure.
Calibration procedure: Firstly, this scale comes factory calibrated to
20grams. We need to change calibration to 5 grams. Here's the procedure:
1: press power button. Wait until 0.000 is displayed. Verify units
by noting the symbol lit in the upper left corner of the display. If it
does not show the letter "g" lighted, press the units button to cycle
through the seven available units until it the letter g lights.
2: Press and hold the power button until the display disappears,
continue holding until "0" shows on the screen, then release.
3:
"0" will be followed by a blinking number value (likely 20.000) That
indicates the current calibration value. To change that value press and
release the unit button repeatedly until you see the number 5.000. The
blinking continues. but don't stop now, we're not done.
4: within
5-6 seconds place a 5gram weight at the center platform or on the white
pad of the extension (whichever is to be used) Wait until the 5.000
stops blinking, then the gauge will return to normal measuring mode and
the display will show within ±.005g of 5.000g.
5: Remove the
calibration weight and turn off the gage. The vtf scale is now
calibrated and ready to use for checking vtf.
Btw, I've worked
through the above procedure and can report that with the scale
calibrated to the 5.000 gram standard, it did read out 4.995g. That
makes sense when you consider that in that third decimal , scale
resolution is to the nearest .005 g.
--
Stuff you might want to know:
And then there is the way that "extension" gets fixed into position. A
little oblong tab at the bottom of the lock screw needs to rotate into
position roughly angled into the slot it must hook. In practice you soon
realize that the special screw and oblong tab at its other end are
locked in rotation to one another and that you can aim the tab quite
easily by turning the knurled head between your thumb and index. That
said, you might find it simpler to deal with this in bright
lighting....Perhaps working under a desk lamp will do.
* (click thumbnail for full image)
-- The above image, scanned from the manual, demonstrates the catch.
-- Two more views of the locking screw:
* Close up detail of the assembly.
* Detail of the lock screw. Custom machining here.
--(hint click thumbnail for full image)
-- Observations, thoughts and summary:
-- Once familiar with the
setting up of this instrument, actual use is convenient and easy. At $30
bucks plus ship, you can't go wrong.
-- Misc. scans from
the manual.
* Installing the cantilever extension
* Calibration (you'll need it)
* What comes in the kit
--There is more to it, but you get a manual if you buy one.
--Recommended.