-edible zone-
-- Not the arm! Thorens arms? (shudder!) Smile!
-- Introduction
Do look at the TT set-up article - at the Van
den Hul site – or at the Audio Asylum’s FAQ - before going any further.
Remember that you are trying to extract information that is a thousand
times thinner than one of your hairs is. I was particularly impressed by
this as my hairs are very fine.
Brands / models that can be done
via this approach include all AR’s, most Ariston, Linn LP12, Systemdeks,
and Thorens’ - TD125, 145, 147, 150, and the 160’s. Do visit the TD 125
part of this site if you have a125 or 126, you will need to.
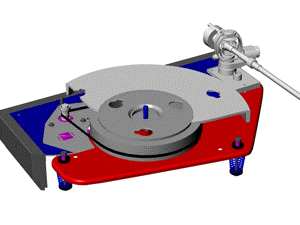
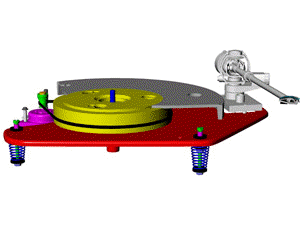
These turntables all use three springs to isolate the record playing
process from the sound of your speakers and some other vibrations. The
weight of the sub-chassis and integral arm board, and the, usually two
piece, platter and bearing sits above the top of the springs.
-- But, there are actually two further suspension elements:
the drive belt and the arm lead. This
will become more important or apparent as we work through the steps.
--#![]()
--These elements along with the mass of the sub-chassis platter and arm / board together form a low-pass filter – ie only frequencies below the resonant frequency will enter the system. The major corollary is that the lower this frequency is, and the higher the ‘q’ - the better. Another reason for dropping the foam inserts, as is suggested below.
-- The foam inserts have the effect of shorting the filter to the plinth - via the suspension tower bolts. They also lower the ‘q’ of the filter and make it less effective. They do help in some cases where footfalls are still going to get in. If you cannot, or will not eliminate this problem by proper mounting, see below, and retain the foam inserts, this set up approach just won’t work as well. (On Thorens’ only, maybe some AR’s?)
*
-- These are a distinct group of TT’s, different from those TT’s that hang the masses from the bottom of the springs, often using 4 springs. Most American high end TT’s, the Michells, Oracles, and the Kuzma Stabi.
The SME 30 and 20, are the most obvious of this type.
* SME 30

I call them all - 'hungies'.
Generally, with this type, the isolation is better and the set-ups
last longer than on the TT’s we are going to visit with.
So, you
will have to do this again, less often if you use the nylock nuts, - see
JIGS.
But, ours are cheaper! :-).
Support and Vibration aka Mounting yr
Turntable
Is yr TT sitting on top of a rack that stands
against the wall, but it’s on carpet with underlay under that? Yes, well
just stop right now and forgeddabahdit! Wobble of this type is
even more destructive of the sound than an aging soprano’s excess
vibrato!
Put a strong wall mounted shelf at the same height and
mount the TT on that. Or something equivalent.
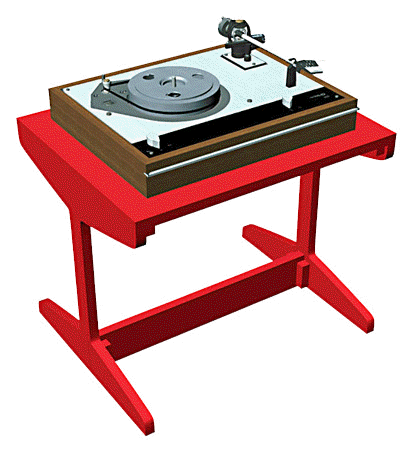
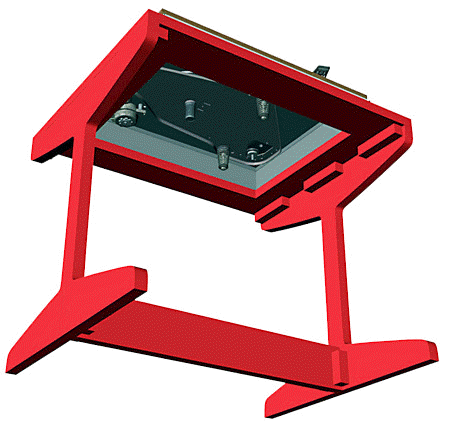
* Apollo
(commercial)
Apollo
(commercial)
 diy
concept
diy
concept
(note the potential for open access to underside of turntable on
these racks )
You must mount the TT on a proper support that
stops footfall and other mechanical vibrations and holds it relatively
still.
The top of a rack like I have described is the worst place
for any TT, and even worse for a suspended TT, as it will be in
oscillation nearly all the time!
Suspended wooden floors are a
bad basis for 'sprungies' of any kind.
A concrete slab floor is
an answer only if you spike the stand to the concrete in the slab floor.
Sorry, physics.
NB - Spikes do not damage carpet. Well, no more
than a safety pin through your dry cleaned blouse does.
(NB = "
Nota Bene", in English: "take note")
Don’t bother going further
until this is done. What follows is a waste of time otherwise.
The shelf or slab or whatever can be useful for setting up, especially
if you can remove the shelf and still mount the TT dead level and get
underneath it for set-up. Do bear this in mind. NB A shelf underneath
for brushes, cleaning fluid, spare head shells etc removes the need for
a support wider than the TT’s own plinth.
If you are building it
then take this section into account and the paragraph above.
When
we achieve some initial stability we will find that the suspension can
isolate quite well.
And that the sound improves quite a bit, too.
____________________________________________________________________________horizontal
rule
Tools and Equipment, Safety
Vital: 1 You
will need a residual current detection device in the AC line. AKA safety
switch, or ELB - earth leakage breaker. This may save your life!
If only for the set-up work. Just for that period when you are getting
the bounce totally right.
You see - platter rotation under power
can create wobble too, so it is a necessary part, in the final stages.
2. A level bench or shelf.
Ideally this should allow you to
get underneath, base off, and get twirgly with the springs. Otherwise
you’ll need some blocks or something. Blutak them in place and squish it
flat. See shelves above and jigs, later.
Other items:
An effective stylus cover – especially if you have an MC cartridge
sitting in the arm and in a fixed headshell!
A small spanner,
tube spanners are ideal (looks like a cylinder with the hexagons for
nuts at either end). About 2 or more inches long, and not a ratchet
driver. Usually has a hole through both sides for a rod, allowing you to
twist it. 3 of are even better.
Three ‘permanent marker’
pens in distinct and dark colors. Black, red and green?
A decent
ruler - with millimeters on it. Or a gauge.
Four clear plastic
containers with seal-able lids.
Some cleaning fluid - I use Mr.
Sheen.
A gentle (plastic wire) scourer.
Paper towels and (nose
type) tissues.
An old but clean tooth brush.
Some q-tips or cotton
buds.
Some pure water for rinsing.
Cotton gloves, buy them at a
hosiery counter!
Talcum powder.
Some blue tack or similar to stop
your platter revolving - and to stopper the bearing hole.
Desirable
A capacity for stepping back, and walking away. Not quite
Zen but you get the idea.
A ‘jig’ would be really nice - see separate
section at the end.
Disassembly
Stage 1.
Invert outer
platter with a mat, an LP, and your clamp on top, measure height to the
platter from top of plinth, this is a useful guide for setting up, write
it down.
Remove outer platter. Measure height again, write it down.
Put on gloves, remove belt, place in first plastic container and
close lid. Take off gloves and put somewhere where they’ll stay clean.
In another container?
Remove inner platter or hub and plug hole
with some blutak. The sub-chassis should be almost touching the top of
the plinth by now.
Unplug TT.
Find safety device and check
that you can plug the TT in to it. Do not turn the TT back on! Yet.
Stage 2
Remove base
and put it and its screws and feet somewhere safe and away from the work
space.
Remove all three nuts noting where each one went, a dab
from a different marker pen, and a dab on the matching bolt hanging down
in the plinth from the motor plate. If they are loose, tighten them up,
this is very important. You will need a screwdriver and a small spanner.
See tube spanners.
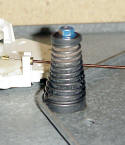
Remove springs washers, foam inserts and the
grommets at the top of the springs. These last fit into circular
cut-outs in the sub-chassis.
Put springs in a separate container,
and put the rubber bits in with the belt.
Put the foam bits
somewhere else. You have got a good stable / still shelf or mounting now
haven’t you? Good, then you won’t need them!
Clean both the top
and bottom edge surfaces of the cut-outs in the sub-chassis, as
mentioned above, rinse and wipe down.
NB You should first check
these cut-outs for burrs, with a finger gently, (sand off). OUCH! Thanks
Steve.
Take a break!
Cleaning
the belt – stage 3
Put on gloves; hold belt with tissues,
spray belt and pull through the tissues, until you think it is clean.
The tissues will tell you anyway.
Rinse off and dry it with more
tissues.
Place in a separate container that has some talcum
powder in it.
Cleaning the other
rubber bits- stage 4
Spray them and then clean them
thoroughly but gently, of all gooey sticky crap.
Especially in
the grooves where the spring ends sit and where the subchassis slots in.
Use paper towels, scourer etc.
Rinse off in water.
Put
on gloves to dry with paper towel or tissues.
Pop all the bits
into the talc container with the belt.
NB Clean the metal
washers that go at the bottom of the spring assembly in the same way.
Toss to coat with talc !
NB clean the inner hub’s
running surface and the drive spindle on the motor, buds are great for
this. Wash, rinse and talc!
Reassembly – stage 5
Do this with gloves on. At least
while assembling and replacing the assemblies!
Reassemble one set
of top and bottom grommets, washer, and spring, noting its colour
marking. Replace on matching bolt and secure with one new Ny-lock nut,
or the original. Twist top grommet into place, slowly and gently.
Repeat for all springs.
Replace inner hub, and adjust height
with the nuts to approx. yr second measurement.
Take a
break!
Reassembly cont’d –
stage 6
Replacing and adjusting the belt. Early centering.
Put on gloves again and replace the belt.
If it has stretched
a little try putting a twist in it on either side of the drive spindle.
This will shorten it a little and help it release from the spindle and
hub. NB The Well Tempered range of TT's adopted this idea quite early
on.
Get together the outer platter and mat and an old LP. But
invert the outer platter and put it on the other bits on top too -
include yr clamp or record weight -if you use one.
Inverting the
outer platter on the hub? This is so you can see to
center the
belt using the screws around the motor.
It also increases the
tendency to wobble in the vertical axis. So, a good bounce at this stage
is likely to be even more stable after turning everything back over, eh!
You can now adjust the angle / height of the motor spindle this
affects where the belt runs. There is a? screw with a spring beneath it
beside the motor for this.
NB you will find that there are three
screws for this motor two of which do not affect the angle of the
spindle, but they do need to be loosened off to allow this and then you
tighten them again. On many aThorens sprungie these and the suspension
bolts are loose. Motor noise usually goes away after this has been done,
otherwise – damn, a new motor!
You will need to do a basic adjust
on the suspension for height and level and subchassis centring at this
point, remember the first measurement we did.
Centering? You
twist the suspension units, by pressing them up and away from the nuts,
so as not to change the level.
You will need to turn the TT on .
The belt is running correctly when it is on the fattest part of the
spindle for 33.33.
You can now start centering and leveling for
serious, but for the moment turn the TT off. Safer, eh!
NB - when
setting height, esp. if you have added mass (damping) to the sub-chassis
or platter/s you may find that a lower height setting compresses the
springs less, and you may be able to adjust this.
A slightly
freer bounce just might result.
Remember that there isn’t much
range because of the speed change lever that moves the belt. Does yours
still work?
If you ever go to an electronically regenerated
supply or DC the kit may have two speeds and can ditch that lever. AND
yr set-up can only be optimal for the one setting of the belt-run.
Apologies to all the popular music vinylists with lots of 45’s.
Stage 7 - Centering and final bounce.
*
(Editors note: above illustration is taken from the LP-12 setup manual.
Rather Thorens-like, don't ya' think..?)
NB keep everything on
the platter, that is usually there, now right way up, eg. do up the
clamp.
You twist the suspension units, pressing them up and away
from the nuts……. Until the chassis is centred and then adjust with the
nuts to level it. Iteratively.
The little bulls-eye level is very
handy here. Vital?
Check again that the TT itself is level at
this point. Use the long level.
Take breaks from here on in. You
may get lucky and you may not.
NB the TT must be on and going
around now. Now you know for vy ve haff the safety switch – oi vey!
Keep going until you have a nice smooth and quiet vertical bounce to
taps with one finger. Where? Tap just to the right side of the centre
spindle and a bit towards the arm, but still within the label area.
Once you have found a good bounce, and if you are going to replace
the base and screws and feet, there is a bit to do still, and you will
have to be very careful.
You don’t want the assemblies to move
relative to the sub-chassis now do you!.
(The feet are a
compliance, so I don’t replace them).
My TD 150 sits on a marble
slab, so I don’t use the base either. The marble is spiked to a cast
concrete house step, sitting on forged angle brackets bolted into an
exterior wall. It doesn’t move, OK!
Remove the platter, and hub,
first, stopper the hole too. Then replace the base.
NB if you do
have one or three tube spanners and if the base has the three cutouts
you just might be able to adjust the suspension and centring with it on.
Otherwise be very slow and gentle while replacing the base.
Check that the TT is level on its mounting and…
Done.
Apart from listening!
You should notice a substantial
improvement in noise floor. Surface noise/display--it should now resolve
in another plane than does the music. Bass should not only be deeper but
also much more articulate. Fingers on strings and frets, different
pluckings etc. etc. Dynamics will be a whole lot better, macro and
micro. Depth is wow. You SO will love it!
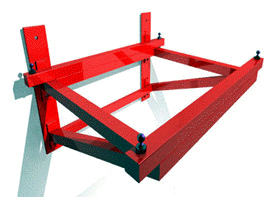
WHY a JIG?
If
you are going to stay with yr ‘sprungie’ / Thorens', you will be doing a
set-up once a year or so. More often if you use a threaded record clamp,
like my GB clamp!
After you’ve done it once, the job does get
easier, and smoother.
*
-- Above: a simple concept for a jig.
Still, a jig - to hold the chassis and wooden plinth level and
steady, while working from underneath, is a great idea.
Linn made
one for the LP12; an ex-dealer here in Canberra has one, which I borrow,
when I do a LINN.
Use some speed frame and some clamps as well.
The frame needs to be high enough so that when used on a bench, you
can work underneath and see up inside, without having to contort too
much!
Lockable leveling screws in the bottom of each leg might be
nice too, level it with a long level, add a bullseye level and a safety
switch and there you are.
I have another path in mind,…….,
later....