-edible zone-
 (click for full size)
-- Above: A Thorens TP16 in complete disassembly, and slightly damaged. Can you find the damaged part? Click above image for full size.
-- Date: 12-08-2010
-- Taking it apart completely:
-- Recently another TD160C came my way. It had mostly good features to it but, unfortunately, it had a bent arm tube on its TP16 tone arm. In order to replace the arm tube it is necessary to disassemble the tone arm completely. This way we get to see all of the parts inside.


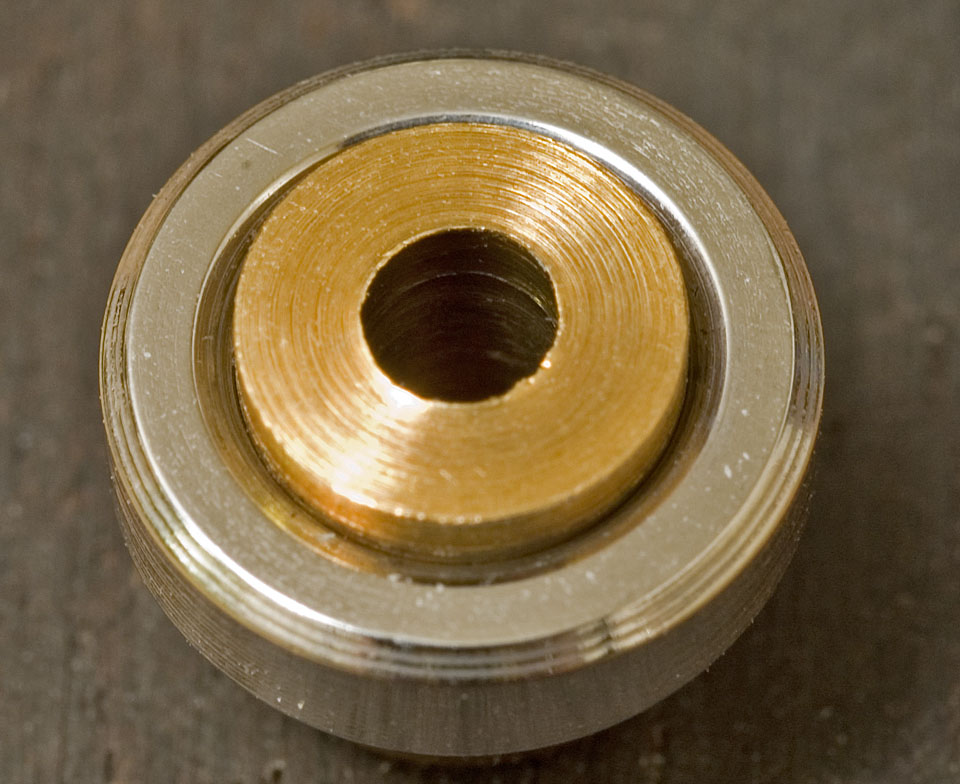
-- The lower horizontal pivot bearing. Cone and cup variety. Cone is a ball race. The cup is pressed onto the lower body barrel and consists of a circular array of steel bearing balls. The cone can be seen as the conical ball race mounted on the shaft in the photo at left.
 Another
view of the lower horizontal bearing cone.
Another
view of the lower horizontal bearing cone.
 (hint:
click thumbnail for full size image)
(hint:
click thumbnail for full size image)
 left: one of the two vertical pivot bearings. Cone and cup design. The
cup features 5 steel bearing balls in a race. Adjustment is by fine
pitch threads on the cup and in the gimbal housing.
left: one of the two vertical pivot bearings. Cone and cup design. The
cup features 5 steel bearing balls in a race. Adjustment is by fine
pitch threads on the cup and in the gimbal housing.
 The vertical pivot cones are part of the same shaft, which is pressed
into the cast housing
The vertical pivot cones are part of the same shaft, which is pressed
into the cast housing
 Upper horizontal pivot brg. cone. Showing some dust clinging to
its bearing race.
Upper horizontal pivot brg. cone. Showing some dust clinging to
its bearing race.
____________________________________________________________horizontal pivot
The next stage is to replace the bent arm tube with a straight one.
 The
replacement arm tube prior to assembly of wires and coupler joint.
The
replacement arm tube prior to assembly of wires and coupler joint.


 There. The replacement arm tube with tonearm wires and coupler
joint assembled. The old damaged arm tube can be seen above the
new one.
There. The replacement arm tube with tonearm wires and coupler
joint assembled. The old damaged arm tube can be seen above the
new one.
____________________________________________________________________horizontal rule
-- Further assembly details:

 (click for full size)
 The
vertical pivot brg. cups have been flushed out with acetone to remove
any dust/debris/residue.
The
vertical pivot brg. cups have been flushed out with acetone to remove
any dust/debris/residue.
 Vertical
pivots installed. Adjustment is prelimary. Each cup screws
in equal distance to fully engage the cones while locating the arm tube
at the center of the gimbal.
Vertical
pivots installed. Adjustment is prelimary. Each cup screws
in equal distance to fully engage the cones while locating the arm tube
at the center of the gimbal.

 The vtf adjuster wheel requires the spring and detent ball to be
assembled prior to fitting.
The vtf adjuster wheel requires the spring and detent ball to be
assembled prior to fitting.
 With
spring and detent ball in their socket.
With
spring and detent ball in their socket.
 VTF
adjuster wheel in place. Note the very thin, almost invisible,
cord that slots into the pocket within the wheel. As the wheel is
rotated, the cord tensions another spring within a tube above the
counterweight. It is a little tricky to install this cord
correctly. Sorry, no photos for this detail but if you have made
it this far, I'm confident you'll figure it out as I did.
VTF
adjuster wheel in place. Note the very thin, almost invisible,
cord that slots into the pocket within the wheel. As the wheel is
rotated, the cord tensions another spring within a tube above the
counterweight. It is a little tricky to install this cord
correctly. Sorry, no photos for this detail but if you have made
it this far, I'm confident you'll figure it out as I did.
 VTF
wheel with the upper horizontal bearing cone assembled. The cone
looked good under magnification. Was cleaned in acetone.
Wiped dry with soft cloth and mounted.
VTF
wheel with the upper horizontal bearing cone assembled. The cone
looked good under magnification. Was cleaned in acetone.
Wiped dry with soft cloth and mounted.
 anti-skate
magnet...above
anti-skate
magnet...above
 anti-skate
magnet...underneath. This is not a particularly strong magnet.
A refrigerator magnet exerts greater energy than this one. It fits
up beneath the under gimbal and is held in place by the steel tube that
holds the lower horizontal pivot bearing cone. The steel tube
threads into the bottom of the inner gimbal and clamps the magnet
solidly.
anti-skate
magnet...underneath. This is not a particularly strong magnet.
A refrigerator magnet exerts greater energy than this one. It fits
up beneath the under gimbal and is held in place by the steel tube that
holds the lower horizontal pivot bearing cone. The steel tube
threads into the bottom of the inner gimbal and clamps the magnet
solidly.
 The
inner gimbal being assembled into the outer frame. The tube
extending out of the frame threads solid into the bottom of the inner
gimbal. The tube contains the lower horizontal bearing cone.
The aluminum housing, just to the side, contains the lower horizontal
bearing cup. The steel tube fits down into housing to engage the
bearing cup. Housing screws into bottom of the outer gimbal frame.
The
inner gimbal being assembled into the outer frame. The tube
extending out of the frame threads solid into the bottom of the inner
gimbal. The tube contains the lower horizontal bearing cone.
The aluminum housing, just to the side, contains the lower horizontal
bearing cup. The steel tube fits down into housing to engage the
bearing cup. Housing screws into bottom of the outer gimbal frame.
 With
the housing partially assembled, but the upper horizontal bearing cup is
not yet in place.
With
the housing partially assembled, but the upper horizontal bearing cup is
not yet in place.
 With the upper horizontal bearing cup assembled. It threads into the
outer gimbal frame to engage the upper horizontal pivot. Preliminary
adjustment of the horizontal pivot bearings is to gingerly thread the
upper cup until solid contact is made against the cone. Both upper and
lower horizontal pivot bearing tension is adjusted by the upper cup.
Free movement of the armtube is retained while the cups and cones are
adjusted rather solidly. When finished, there is a decorative dust cap
which snaps into place above this upper bearing cup adjuster.
With the upper horizontal bearing cup assembled. It threads into the
outer gimbal frame to engage the upper horizontal pivot. Preliminary
adjustment of the horizontal pivot bearings is to gingerly thread the
upper cup until solid contact is made against the cone. Both upper and
lower horizontal pivot bearing tension is adjusted by the upper cup.
Free movement of the armtube is retained while the cups and cones are
adjusted rather solidly. When finished, there is a decorative dust cap
which snaps into place above this upper bearing cup adjuster.
 Preliminary
check to view the partially assembled tonearm.
Preliminary
check to view the partially assembled tonearm.
![]() Another
view.
Another
view.
__________________________________________________horizontal rule

-- In the box was this Grado Prestige Black. Used that for the test.
Alignment notes:The Thorens headshell jig is used to set overhang.
Every TD160C came equipped with several accessories including the
headshell alignment jig. Most, unfortunately, have been lost by their
owners. I managed to keep mine. If you lack the headshell jig, overhang
alignment for the TP16 is per Stevenson. So get a Stevensen based
2-point alignment protractor. Although it is sometimes possible to use a
Baerwald protractor, (on this tonearm), but only if the distance between
stylus and mounting holes on the cartridge you've got fitted is not too
long. (Baerwald overhang lengths tend to be longer than Stevenson
overhang lengths) Azimuth is set using a mirror and the headshell jig.
VTA is set by leveling the arm tube to the platter. Adjustments made at
the base mount using the two set screws to release /adjust height/
re-fasten. VTF is set by first balancing the arm to float slightly above
record level with vtf ring set to zero, then adjusting the vtf ring to
2.0 grams of downforce. Antiskate was initially set to 2.0 grams, but
later re-set during the hfnrr test record session to improve the scores
on the bias tracks.
For more detailed information regarding
tonearm and cartridge alignments see this link: here
For more
detailed information on using the TP60 headshell alignment jig link:
here
HFNRR Test Record session (HFN 001)
-- Side 1
R/L was swapped, swapped again to correct
phase=OK
bal=ok
bal -L=ok
bal-R=ok
clean
clean
clean
buzz left
-- Note: tracks 6 through 9 (Bias tracks) are sometimes referred to as the 'torture tracks' because they measure tracking ability by providing a 300 hz tone with increasing decibel levels at each succeeding track. A clean pass means that the arm/cartridge was able to track through the band without buzzing at either channel. Tracks 8 and 9 are generally regarded as overkill in that there is likely no Lp track that will duplicate this level of amplitude. However these tracks are useful as a repeatable measure of how well a given arm and cartridge can negotiate them. In this case it appears that this relatively inexpensive tone arm and cartridge has scored very well. Very few tone arms/cartridges can pass cleanly through track 9. .......This indicates that the cleaning and adjustments made to the pivot bearings was successful.
-- side 2
trackability = clean
lateral arm/cart resonance test = 9 - 10 hz
vertical arm/cart resonance test = 10 - 11 hz
trackability = clean
bal-R=ok
clean
equal by ear (azimuth check)
unmodulated groove to evaluate residual system noise = quiet
trackability = clean
-- Listening check
-- I put on Paul Simon, There Goes Rhymin' Simon. This Lp I am very familiar with and use it as a check for VTA setting. The limit here is the low priced Grado Black. This is their lowest priced offering. Even so, it re-produced the music on this Lp cleanly and with good ambiance. I have to admit, however, that this tone arm deserves a much better cartridge than the Grado Black. In the past I have listened to other TP16 (mk1) tone arms using much higher quality moving magnet cartridges to very good effect.
-- Conclusions:
-- The cleaning and adjustments made to the pivot bearings resulted in a tonearm that tracks difficult grooves very well. Frankly, I am surprised that it scored as well as it did on the hfnrr test record 'torture tracks'. All in all.....a success. Given this level of encouragement, it seems logical to consider the possibility of upgrading the standard tonearm wires of this tonearm to a higher quality wire. Silver perhaps. And then the RCA cables could be replaced with a high quality RCA jack plate with nice gold plate RCA jacks to accept the IC of your choice.
-- Additionally, I wonder how well this tonearm would handle low compliance MC cartridges known to energize arm tubes with needle talk. Would a Uwe bodied DL103R tend to rattle the pivot bearings on this tone arm, or would they handle the energy and allow the DL103R to sound like itself?