
-edible zone-

Above photo: The SP10mkII securely buttoned-up within its new "Mule" plinth. Tonearm: Graham 2.2. Cartridge: Shelter 501 type II moving coil. Old style Stillpoints cone feet and standing over a Neuance isolation platform
For detailed documentation of the process, see the linked pages below: To read an overview, continue reading this page.
_________________________________________________horizontal rule
Summary:
Receiving:


This story begins with a purchase. I saw this motor unit for sale
online at AudioGon. It turned out that I recognized the seller. A
friend. I made contact via email. We came to terms on a price and the
transaction was made.
The price, while not inexpensive, proved to
be quite fair in view of the almost excellent cosmetic condition and in
view of the very excellent operational condition. Just to be safe I
dribbled some 20 wt turbine oil down into the tiny lube hole next to the
motor spindle. I was generous just to be sure it wasn't going to run
dry. But I did not take the motor apart to actually see what the bearing
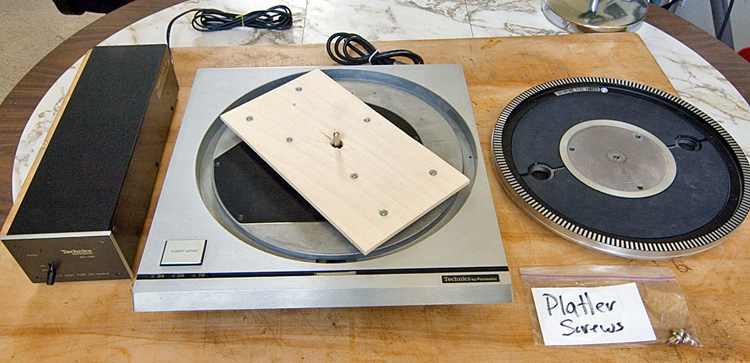
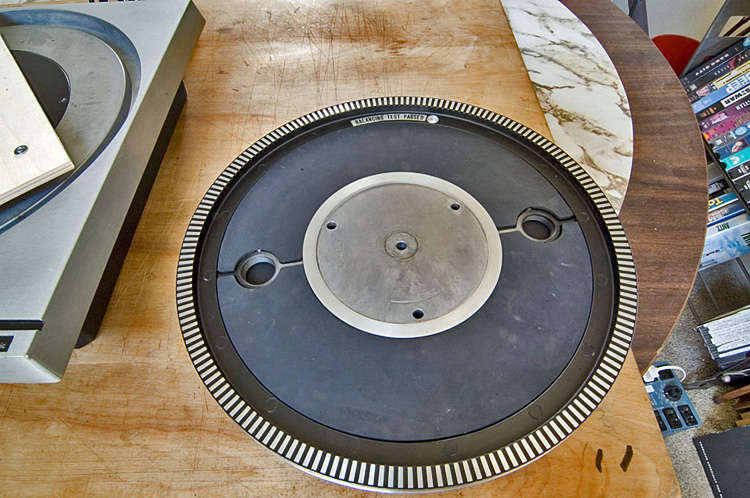
looked like. That would come later. Next I assembled the platter over
the motor by its three unique and almost impossible-to-replace machine
screws. Allowed the motor unit to stand alone on my project table.
Sitting next to its standalone power supply. With the power supply
plugged into the turntable, I switched it on. Then I pushed the Start -
Stop button and watched as the platter took a fraction of a second to
reach 33-1/3rd rpm.
Then later I noticed that I could simply
push the 45 or 78 button and the speed instantly switched to it without
any drama. Instantly and smoothly. With the platter powered and running
I could place an index finger onto it, even firmly and watch as the
strobe window would indicate the initial drag with just a hint of
slowing and then almost as instantly correct and hold the speed it was
assigned to maintain in spite of the added drag. Hmmm. It became quite
clear, this was going to be very different from my previous belt drive
and idler drive turntable experiences.
Early Listening:
For a month I just allowed the SP10 to stand on the table wired up as
it was and occasionally pushed its buttons to see if anything was going
to fail or somehow falter. No errors. The strobe window, well lit and
and indicating a rock steady strobe reading, gave confidence. This piece
of engineering came from 1975, and is amazing still today.
Enough
already, lets get this into a plinth so I can spin some Lps!
Link here for the details of the initial plinth. I took plenty of
photos to document my earliest experiences. See the link for that. For
this current project page I just want to summarize each phase of the
project. The first plinth I'll call the "early listening" phase. This is
my first experience with the SP10 and my initial thoughts, which I wrote
probably indicate any preconceived expectations and attitude I may have
had regarding direct drive turntables whose speed was controlled by
integrated circuits. (chips).
I did not spend too much time sweating over the details of that first plinth. Same concept but with different levels of mass. To keep in step with 'the then' current popular trending, I chose to build the higher mass version I had drawn.
 (click thumbnail for full size dwg)
The one at bottom.
 Still not sweating too many details. It's not all the way sanded down
and I had the SP10 up in the heavy plinth spinning Lps after a couple of
days work in the shop. Zeta tonearm. Denon DL-103R in a Panzerholz body
by Uwe and with the ruby cantilevered fine-line diamond installed by
SoundSmith I was ready to hear what this motor unit could do. Not my
very best arm and cart setup, but not far from my best.
Still not sweating too many details. It's not all the way sanded down
and I had the SP10 up in the heavy plinth spinning Lps after a couple of
days work in the shop. Zeta tonearm. Denon DL-103R in a Panzerholz body
by Uwe and with the ruby cantilevered fine-line diamond installed by
SoundSmith I was ready to hear what this motor unit could do. Not my
very best arm and cart setup, but not far from my best.
What I
heard then was encouraging. Very good tones and textures. Very crisp
detail articulation. Excellent overall detail delivery. Better in that
way than I'd heard from my previous reference, the Teres 145. I think my
earliest impression was that the Technics motor unit did not actually
better my TD124 in terms of energy delivery. You know, those big notes
jumping out of the speakers and into the space before you with sudden
energy. But after a few weeks of listening I was reconsidering this
observation and noting that it was indeed producing a very enjoyable
listening session while playing different records from my Rock library.
It wasn't just classical music where this player excelled. It was all of
it. I knew then that I had a seriously good motor unit in house.
Disassembly:

I listened to it like this for a few months, then took it down
off the dedicated TT stand I have, and moved the motor unit to the next
step. The TD124 took its place back and once again served as my primary
record spinner while I could take some quality time doing mechanical
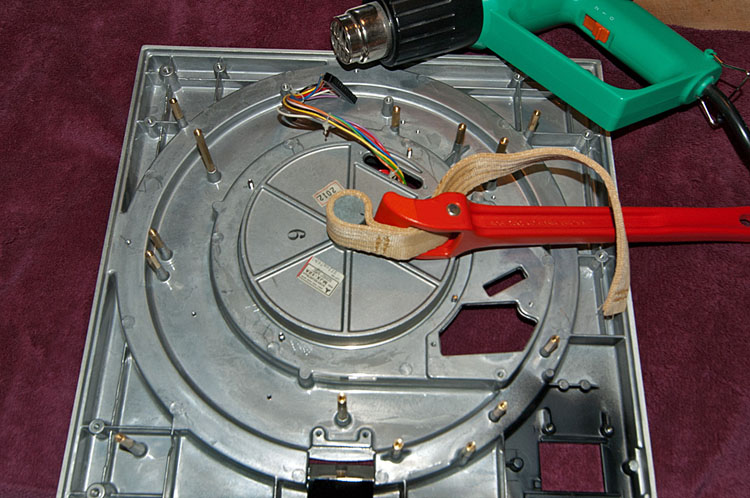
stuff with the SP10mkII. My next part of the process was to disassemble
the motor unit completely, and to document this so that re-assembly
would not become a challenge. I think what I noticed the most during
this process was how many small fasteners the thing goes together with.
Those Matsushita engineers were very thorough in making certain that
this baby was very well buttoned up. And it is very well buttoned up
indeed. So I documented this part of the project with photos more than
text.
Afterward, I boxed all of its parts in an organized and
careful manner using anti-static bags for the printed circuit boards,
and put the thing, disassembled and in its own box up on the shelf for
several months. By now I had still other projects to get going on.
The Mule Plinth:
Fast
forward nine months or thereabouts. With all other projects caught up I
chose this for the next project. I had determined from my previous
experiences that there weren't any obvious faults with this player. Its
function was right on the dime. The platter brake didn't rub. The strobe
window was rock steady. Push a button and it did the correct thing.
Sound quality was sweet.
In fact the player had destroyed
whatever preconceived notions I may have had about direct drive
turntables. Remember those comments from M. Fremer in this or that
review * about how direct drive tables from this era, and even current
times, were prone to delivering that same defect that CD players do,
Jitter. Honestly, I suspect this is pure imagination. I heard nothing
but good notes out of this thing. And I have had other turntables on
hand to make A/B comparisons with. Both belt drive and idler drive
types.
*( but mostly that review he wrote on the Grand Prix
Monaco direct drive turntable)
I digress. The early listening
session was useful as a shake-down run to see what parts fell
off...metaphorically and physically. No metaphors were hurt and nothing
physical fell off so I decided my next part of the project would be to
focus on another plinth design. Besides, and in the meantime, I had
given away my 'early listening' plinth to another SP10 mkII owner in
need of one.
Something different. Idea of it not sorted. 'Drew
many sketches. Wasted entire summer of 2013 making drawings I would not
use. Then, late August, I took a break and thought about other projects.
A couple of weeks later, a new idea for the SP10 comes. This one.....

The Mule. Initially I thought of it as a "test mule". I wanted it to be as reasonably light as it might be while retaining structural rigidity. Then, I thought, I'd use it to test for noise generation. The idea being that any noise being generated by the motor unit would not be damped, and therefore masked, by a high mass plinth. Another consideration was that I wanted to keep the turntable's footprint as small in area as I could. A third consideration was to minimize the visual effect one gets when mounting a 9 inch tonearm next to one of these rather large motor chassis. This turntable was originally designed for 10 inch effective length arms. And a 9 inch arm just seems rather small and proportionately wrong when parked next to it. So, I thought I could mitigate the visual distraction by reducing as much of the supporting structure as possible. A minimal plinth. That way the first thing you see when looking at it is the motor chassis and the arm. That was the intent, anyway.

The build was detailed and tedious, but not
particularly difficult. Numerous cutouts of 1/2 inch thick baltic birch
multi-ply. Stacked precisely via dowel pins and glued together with hide
glue. The resultant structure has proven to be rigid enough for the stop
/ start antics of this chassis and it carries the weight with ease. But
I do note that I would not load it any heavier. (ahem) The
sound quality I hear out of this build exceeded my expectations. Very
notable is the exceptional bass reproduction I get with this assembly.
This is the best turntable/plinth/arm/cart setup I have heard in this
room at reproducing bass. I would not have anticipated it. Deep, tight,
well textured and accurate bass. Also, energy levels have exceeded, by a
large margin, what I had heard from the previous higher mass plinth. It
sounds quicker, sharper, more forward and more energetic. Detail
reproduction is reference level to my ears. The best sounding turntable
I've had in this room. Period! *
Not the best I ever heard, just
the best I've owned. And I'm not yet done with it.
Fiddling
with the bearing: link for the gory
details
When I did get around to taking the bearing apart I
found little to worry about. Visible evidence of having been run, but no
measurable evidence of wear. Of some interest to me was the thrust pad
that appears stuck onto the very end of the bearing shaft. At first I
couldn't figure out how this was assembled. Were there internal parts to
it, or was it a...simple snap-on cap.
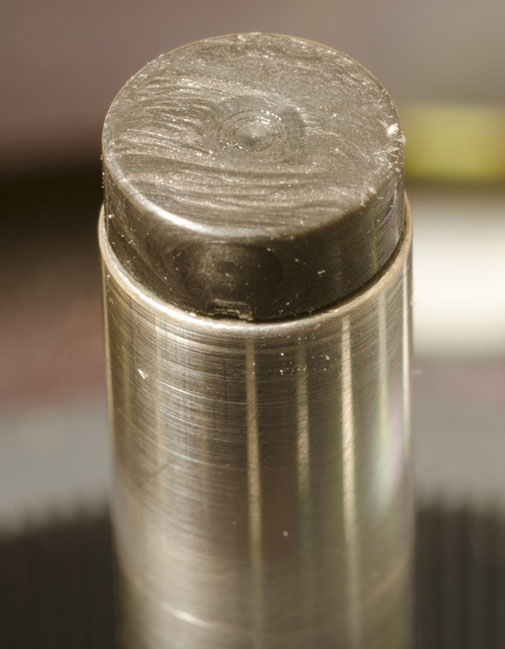
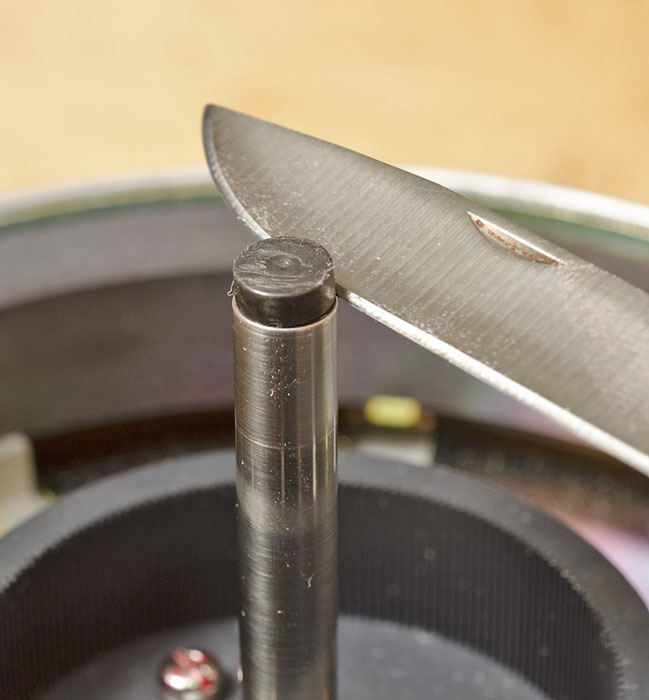


It was the latter. It snaps into place. Matsushita used
what appears to be nylon as a thrust cap material to ride over a fixed
and immovable bearing ball. The bushing sleeves in the housing are
bronze, but not of the porous type. Given this there is a maintenance
factor with this bearing. Periodically oil should be fed into the
lubrication orifice at the top of the motor housing.
Getting back
to the thrust of it. I thought to try different thrust cap materials and
also thrust ball materials to see if I could measure or hear any
difference between them. I did this by machining several thrust caps out
of different materials.
 Torlon 4301
 Torlon 4203
 Delrin
 Hydlar Z (kevlar filled Nylon) Literally filled with Kevlar fibers.
I checked these different cap materials for wear by playing the SP10 for a week with each cap, then disassemble and inspect for the size of the wear dimple in the center of each cap. Nylon (not pictured) fared the worst. The rest were about even and wore less. I measured the player each time for noise and recorded my results. No significant difference in noise levels between these materials. I heard no difference in sound quality. Ultimately, I decided to go with either of the Torlon choices. This simply because it is a more modern material that appears to wear very well.
A harder thrust ball. Is that a good idea? Time will tell.
 SiN4 Ceramic grade 5 bearing ball. latest tech. Harder than the hardest
steel or even carbide. I heard no difference with this bearing ball
installed but I'll leave it in there.
SiN4 Ceramic grade 5 bearing ball. latest tech. Harder than the hardest
steel or even carbide. I heard no difference with this bearing ball
installed but I'll leave it in there.
Lube: using straight 20 wt turbine oil, per Thorens.
The Electronics:
History of the deck is unknown. No
documentation of any service history. The PCB's appear to have original
solders intact. Note that the unit operates without flaw!
notes
to date: 05-06-2014