-edible zone-
-- More tuning notes.
In reference to the
suspension tutorial by Tim Bailey.
Description:The belt drive
is to keep motor vibrations away from the platter, but the belt doesn't
completely isolate. To further reduce motor vibrations that might reach
the point of pick up, a floating sub-chassis holds the platter and
tonearm separately from the motor and the framework to which the motor
is mounted. According to it's designers, this layout is also said to
isolate from acoustic feedback.
*
-- Above image: section cutaway view of a TD160 mk2. This layout is used throughout the TD14x and TD16x model range. Note the drive belt. The flat belt used on these Thorens is elastic to allow for the independent motion of the sprung sub-chassis. Incorrect belt replacements can adversely affect suspension action. Worn, stretched belts can slip during the more dynamic passages in a record and cause your sound to become flat and lifeless. For more info on belt replacement, link here.
* (click thumbnail for full size image)
-- Above photo: An inside view of a standard TD160 mk1 showing the three suspension spring assemblies. Note also the tonearm wires emerging from the tonearm base....? While very slight, these wires will offer some small force counter to the motion of the suspended sub-chassis. One of the reasons tonearm wires need to be small gage.
* A loose suspension stud needs attention.
-- Above photo: (TD 160 mk1) Showing a suspension stud with the spring grommets, flat washer and adjuster nut removed. It is advisable to ensure that the retaining nut (see red arrow) is tight and holding the stud assembly rigidly in place. We have no factory specification for torque against the nut, so use common sense with regard to strength of materials. We are working with sheet metal and thin steel tubing.
* (click thumbnail for full size image)
-- Above image: Section view of the third and "captive" suspension stud from a TD160 mk2. This stud is captive between the motor plate and the top fascia. Essentially inaccessible from the top because the thin aluminum fascia is glued to the motor plate. The other two studs can be seen from the top, when the outer platter is removed, and feature a flat head configuration. Perhaps some owners who don't understand the purpose, will attempt to turn these two screws with a screwdriver. The end result might be a loose suspension stud or two
*
-- Above photo: Springs, grommets, washer and adjuster nut. Note the piece of foam inside the spring. This was added by the factory to dampen spring oscillations. It is like a crude version of an automotive shock absorber. Customers were having problems with foot fall. In practice, the piece of foam did not offer nearly enough damping to solve the foot fall problem. Even worse, and because the foam is in contact with both the fixed stud and the spring simultaneously, it serves to transmit resonance from the motor plate into the sub-chassis. By removing the foam, isolation is improved. Foot fall vibes will be avoided by providing a suitable location to hold and isolate the turntable from it's environment. More about that later.
-- Disassembly:
Remove outer platter, drive belt and inner
platter. If the turntable is a mk 2 or later, there will be a catch
preventing the inner platter from being lifted out. See this link for
method of removal.
Remove bottom cover.
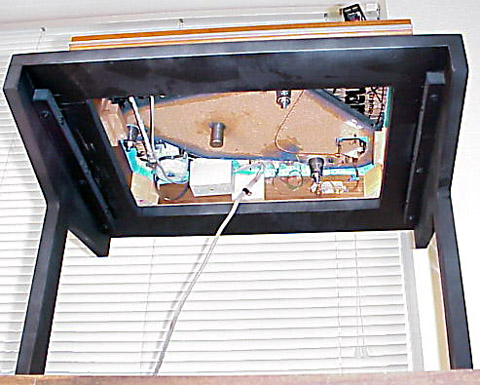
By now you
probably have noticed that you need some way to hold the table so that
you have access underneath the table while allowing upright operation.
How about this..?
--#
-- If the goal is to simply tune the suspension with no further
disassembly, then it will suffice to remove one spring assembly at a
time from the floating sub-chassis for cleaning. This way the
sub-chassis can remain inside the plinth. Take this opportunity to test
the tension of the retaining nut against the stand-off tube of the stud
assembly. Make sure the stud is not loose by lightly tightening the nut.
Cleaning:
1) Wash all pieces of the spring assemblies in a
warm bath of tap water and dishwashing liquid (Dawn for dishes). Towel
them dry before rust can set in on the steel coil spring.
2)
Then, in a clean bowl, sprinkle talc powder over all of the pieces,
making sure there is 100% coverage of talc over every square mm of each
part (except the retaining nut). Talc powder may be found these days at
billiard supply shops. Baby powder may be used. It is also talc but with
a perfume added.
3) with a Q-tip (cotton swab) dipped in alcohol,
clean the white plastic drive pulley clear of belt marks. With a soft
rag or paper towel, also clean the friction surface of the sub-platter.
4) Ensure there are no sharp edges or burrs at the counter-bore
where the large rubber grommet will fit into.
5) Clean the
grommet seating area with alcohol and a cotton swab (cue-tip). Let
evaporate dry. Then apply some talc to the seat and counter-bore with
another clean cue-tip.
6) Replace the Drive belt.
7)
Bearing oil: Take this opportunity to clean the spindle shaft of the
sub-platter and replenish oil in the bearing well. Put enough oil in so
that excess oil will spill out the top of the bearing when the
sub-platter is installed. Mop up the mess. Choice of oil is an option
and debatable. The original factory recommended oil is no longer
offered. My personal choice is to use a straight 20 wt. turbine oil. In
the case of visually worn bearings and shafts, heavier lube oil may be
of some benefit. Link here for visual of bearing well. However, these
bearings tend to hold up well over the years and the standard original
lube is most often the best choice.
-- Reassemble fully.
Setting sub-chassis height:
*
-- above photo: each of the three adjuster nuts are turned to alter
height of the floating sub-chassis. This sets both level and operating
height of the platter above the top plate. Correct platter height will
be such that the platter is not so low as to rub against the motor
pulley, or safety post (if installed), and not so high that the spring
grommets in the sub-chassis make contact with the underside of the top
plate. The sub-chassis must float freely and be level.
Getting the bounce right means better isolation.
The drive belt
is part of the equation as are the platters and mat. Table should be
fully assembled when adjusting the bounce.
*
-- Above illustration: Taken from the Linn LP12 setup guide, the spring assembly is identical to the Thorens we are tuning. Object is the same. The incorrect orientation view will result in contact between grommet and stud. This will inhibit suspension action and allow a path for motor vibes to travel into the sub-chassis.
* (click thumbnail for full image size)
-- Above photo shows the spring being rotated to alter the spring assembly location over the stud. The clean, powdered spring assembly components allow for easy rotation. I found that by rotating the three different springs, the position of the armboard within the port opening of the top plate was altered. It made sense to continue this style of adjustment until the armboard was centered to the port. Incidentally, the bounce became more vertical and freer at the same time.
*
-- Above photo: armboard should appear centered in the top plate opening.
*
-- Above photo: Outer platter is inverted, record, platter mat and
spindle adapter on top. At some point during the tuning session, it is
worthwhile to try this configuration to test the bounce. Why..? Raising
the center of gravity for the platter will make it more susceptible
toward sideways motion. Get the suspension bouncing mostly vertical in
this configuration and you know it's getting close to right.
Some
Bounce test movies in mpeg format. If you have Windows Media Player
(standard with Windows 3x, 9x ,NT /2000/ XP or even that crappy ME, the
media player will pop up when you click on the movie links below. Mac
users can use Apple Quick Time, which also works in Windows.
--
Bounce Test from the Top View (mpeg movie)
--
Bounce Test close up on armboard (mpeg movie)
--
Bounce Test front view (mpeg movie)
--
Bounce Test bottom view (mpeg movie)
--
Bounce Test Inverted (mpeg movie)
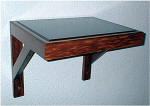
-- Now, where to situate the turntable..?
Is your floor really
solid...? Or, does it bounce a little when you walk...? Do you plan to
put the turntable on top of a floor standing audio rack. Over a bouncy
floor..? If so, you won't like these suspended Thorens very much. They
are sensitive to foot fall vibes. The solution to bouncy floors and
suspended tables is the wall mount. Below are some examples.
* a diy concept in steel tube,
 Bushman's diy rack
* Apollo (commercial)
 Target (commercial)
-- Note the potential for open access to underside of turntable on these racks. Replace the top shelf with a platform that has a large rectangular opening in it and the rack can also function as your tuning jig.